Last updated: November 20, 2026
Teens need account alerts when they want to catch strange spending or logins before the damage grows. How Teens Can Set Up Account Alerts for Spending and Login Activity starts in the bank app, where spending, low-balance, card-not-present, and login alerts can reach a phone fast. The steps below show what to tap, what to turn on, and what “done” looks like. Quick Answer: teens can usually set up the main alerts in under 5 minutes.
Key Takeaways
- Start inside the bank app or website, not in the debit card settings alone.
- Turn on spending alerts, login alerts, and low balance alerts first.
- Use text message alerts for urgency and email alerts for a longer record.
- Check that mobile notifications are allowed on the phone, or app alerts will stay silent.
- Card-not-present alerts help catch online or phone purchases that the teen did not make.
- A parent can often mirror alerts, but the teen still needs their own alert setup.
What account alerts should a teen turn on first?
Teens should start with spending alerts, login alerts, low-balance alerts, and card-not-present alerts. Those four catch the most common problems early, and most bank apps offer them in the alert menu for a debit card or checking account.
Picture this: you open the app after school and want the account to warn you before a bad charge or odd sign-in gets lost in the noise. The 4 alert types below are the ones worth setting first, because they answer the two biggest questions: “Did money leave?” and “Did someone sign in?”
- Spending alerts: send a note when a debit card purchase posts or when a charge is above a set amount.
- Login alerts: send a note when someone signs in from a new device, browser, or location.
- Low-balance alerts: send a note when the balance drops under a set dollar amount.
- Card-not-present alerts: send a note when a card is used online, by phone, or by mail order.
These alerts do not need to be fancy. A simple $10 or $25 threshold can be enough for a teen account with small deposits and routine spending. If a bank only offers one style of alert, pick the one that reaches the phone fastest.
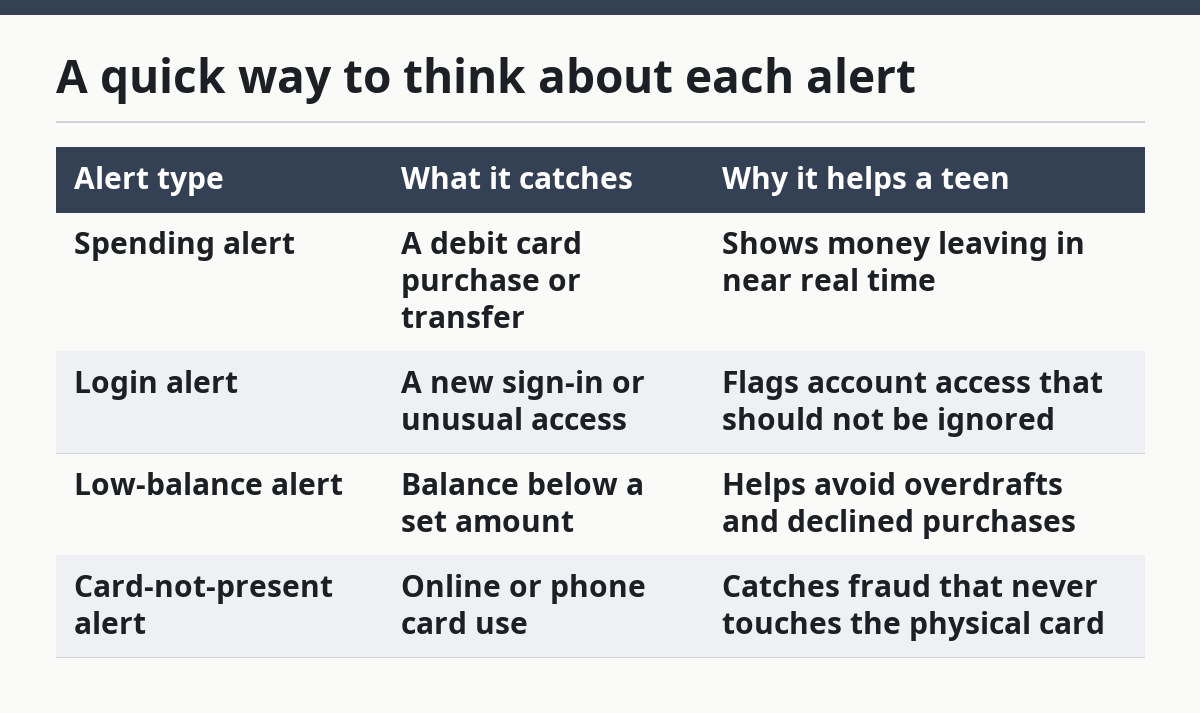
A quick way to think about each alert
| Alert type | What it catches | Why it helps a teen |
|---|---|---|
| Spending alert | A debit card purchase or transfer | Shows money leaving in near real time |
| Login alert | A new sign-in or unusual access | Flags account access that should not be ignored |
| Low-balance alert | Balance below a set amount | Helps avoid overdrafts and declined purchases |
| Card-not-present alert | Online or phone card use | Catches fraud that never touches the physical card |
How do teens set up account alerts in a bank app?
Teens set up account alerts by opening the bank app, finding the alert or notifications menu, choosing the account or debit card, and saving the alert type and delivery method. That process usually takes less than 5 minutes if the bank keeps alerts under “Settings,” “Security,” or “Card Controls.”
Picture this: you’re in the app after logging in, and you just want the message to hit your phone when something changes. Follow these steps in order, and watch for the success sign at the end of each one.
- Open the bank app and sign in. Use the teen’s own login, not a parent’s shared account page. If the app has a home screen, you should see balances and recent activity.
- Find Alerts, Notifications, or Security. Tap the menu, then look for “Alerts,” “Account alerts,” “Message center,” or “Notification settings.” If you found the right spot, you’ll see choices for spending, login, and balance messages.
- Choose the account or debit card. Pick the teen checking account, savings account, or debit card you want to watch. A bank with more than one account usually asks you to select one before you can continue.
- Turn on spending alerts. Pick a rule such as “every purchase,” “charges over $1,” “charges over $10,” or “all debit card activity.” The app should show a toggle that changes from off to on.
- Turn on login alerts. Choose sign-in warnings for new devices, password changes, or unusual access. When it works, the alert list should now include a login rule tied to the teen account.
- Set a low-balance number. Choose a number that leaves room for a meal, bus fare, or small transfer—many banks let you enter your own amount. Save it and check that the alert preview shows the dollar amount you typed.
- Pick text, email, or mobile notification. Select the delivery method you want for each alert type. The app should show a checked box, active toggle, or saved delivery label.
- Save and send a test alert if the bank offers one. Some banks have a “test,” “preview,” or “sample” message. If the alert is active, you should receive a message on the phone or inbox soon after.
If the app asks for a parent or guardian approval step, stop there and finish the approval before leaving the screen. A setup that sits half-finished won’t protect anything.
Which alert delivery method works best: text, email, or mobile notifications?
Text message alerts work best for speed, email alerts work best for a paper trail, and mobile notifications work best if the bank app is already allowed to push alerts to the phone. Many teens use all 3 because each one solves a different problem.
Picture this: a charge posts while you’re at practice, and you want to know before dinner, not tomorrow morning. That is where the delivery method matters more than the alert type.
- Text message alerts: useful when the teen checks texts all day and wants a short, hard-to-miss warning.
- Email alerts: useful when the teen wants a record they can search later.
- Mobile notifications: useful when the bank app is installed and allowed to send alerts on the lock screen.
Each method has a weak spot. Email can sit unopened for hours. App notifications can stay silent if the phone settings block them. That’s why many bank apps let the teen pick more than one channel for the same alert.
Before leaving the settings screen, make sure the phone itself is not blocking the message. On iPhone or Android, the app usually needs notification permission turned on, and Do Not Disturb can silence it for hours. If the alert is set correctly but nothing arrives, the phone setting is often the missing piece.
For setup details, the Consumer Financial Protection Bureau explains that banks and apps may send alerts through texts, emails, or push notifications, and the FDIC also recommends watching account activity closely for suspicious transactions. See the CFPB’s guidance on account alerts and the FDIC’s advice on monitoring accounts.
How should teens choose alert amounts without getting spammed?
Teens should choose alert amounts that catch real problems without firing on every coffee run or snack purchase. A $1, $5, $10, or $25 threshold often works better than a high number that misses small fraud.
Picture this: a teen account gets used for lunch, a bus pass, and one online order in the same week. If the alert fires on every $1 transaction, it becomes background noise. A lower threshold can still help, but it should fit the account.
Use these rules of thumb:
- Pick a low-balance alert above zero. A teen account should warn before it hits empty, not after the card declines. A low-balance threshold like $10 or $25 is common for small accounts.
- Set spending alerts for odd sizes. If normal purchases are $6 to $18, then a $40 or $50 alert can stand out.
- Use card-not-present alerts for online use. That keeps the teen from missing purchases that never happen in a store.
- Set login alerts for every new device, if the bank allows it. Login changes are rarer than purchases, so more alerts here usually help.
- Trim alerts after a week if they are too noisy. The goal is to notice a real issue, not to train the teen to ignore every buzz.
The right threshold is not the same for every teenager. A teen who spends lunch money from one debit card needs different alert numbers than a teen who keeps most cash in savings and uses the card once a week.
What mistakes make teen account alerts useless?
Teen account alerts fail when the wrong account is selected, the delivery method is blocked, or the alert is too broad to notice. Those errors are common because the setup screen looks simple, but one missed toggle can silence the whole thing.
Picture this: the teen thinks alerts are on, but the messages are going to an old email address or a parent-only inbox. The app says “saved,” yet nobody sees a thing.
Common mistakes to avoid:
- Turning on alerts for the wrong account. If the bank app lists checking, savings, and card controls separately, a teen can accidentally protect the savings account and leave the debit card uncovered.
- Using one shared email that nobody checks. That costs time when a strange charge lands and no one sees it for hours.
- Setting the threshold too high. A $200 alert on a teen card misses small test charges and tiny fraud attempts.
- Forgetting login alerts. Spending alerts help after money moves; login alerts can catch account access before it does.
- Leaving phone notifications off. If the app cannot send a push notification, the alert may still exist but never reach the screen.
The fix is plain: after setup, review the alert list line by line, confirm the account name, and make sure the phone, email, and text paths are all active. If the bank lets you send a sample message, use it.
What should a teen do after the alerts are turned on?
A teen should check the alert list once a month, test a message after any app update, and update contact info the same day a phone number or email changes. That 10-minute check keeps the alerts useful instead of stale.
Picture this: the teen gets a new phone and keeps the old number in the bank profile by mistake. The app still says alerts are on, but the warning goes to nowhere useful.
Use this short maintenance list:
- Review alert settings after a phone upgrade, bank app update, or card replacement.
- Confirm the teen’s current cell number and email address are listed.
- Check that the bank app still has notification permission.
- Make sure low-balance and spending thresholds still fit the account balance.
- Ask the bank’s help line or in-app chat if an alert stopped arriving after setup.
For broader teen account safety, the hub page on Teen Banking Account Safety and Access fits next to this one. It covers the bigger picture without repeating the setup steps here.
Do parents need to set up their own alerts too?
Parents often should set up their own copy of the same alerts, if the bank allows it, because one inbox is easier to miss than two. This is still an alert setup task, not a dispute process or a fraud investigation.
Picture this: the teen notices a weird $14 charge at lunch, but the parent sees it later in email and can compare notes. Two sets of alerts make it easier to notice patterns without relying on one person’s phone battery.
A parent copy helps most when:
- the teen’s phone dies during the day,
- text messages get muted,
- the bank app logs out on the teen’s device,
- or the family wants both people to see login alerts.
The downside is noise. Too many people getting every alert can make everyone tune out. If both accounts are connected, decide who gets what: maybe the teen gets spending alerts and the parent gets login alerts, or both get low-balance notices and nothing else.
Which alerts matter most for teens?
Spending alerts and login alerts matter most for teens because they catch money leaving and account access changing. Low-balance alerts come next, since they help avoid overdrafts and card declines, while card-not-present alerts are best for teens who buy online often.
The first sentence under every alert list should be simple: what changed, how much, and where the notice goes. If an alert does not answer those three things fast, it is harder for a teen to act on it.
Can parents receive the same alerts?
Yes, many banks let parents receive the same alerts if the account setup includes more than one notification contact. The bank app may let each person choose text message alerts, email alerts, or mobile notifications separately, and that is often the cleanest setup for a teen account.
The better setup is the one that fits real habits. If the parent checks email once a day, an alert there may be too slow for spending activity. If the teen keeps the phone on silent, a parent copy can fill the gap.
How do teens turn off alerts they do not want?
Teens turn off alerts by going back into the bank app’s alerts or notifications menu and switching off the alert type, delivery method, or account selection. The change usually takes effect right away, though some banks may keep one final message already in the queue.
It helps to turn off only the alert that is causing noise, not the whole setup. For example, a teen might keep login alerts and low-balance alerts, then silence every small spending alert that fires below $5.
Drafted with AI; not yet reviewed by a person.